Recent Questions Drop Down Tree Menu Rails Tutorial
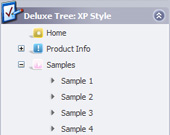
Q: I really like how this works and I think it will wind up working for us, but I have a question. On the xp style dynamic tree menu, is there a way when you click one of the 'headers' that will open up other choices for example on your http://www.deluxe-tree.com/data-samples/tree-menuxp3.html tree. When youclick either the deluxe tree:xp style or the samples gallery or the samples gallery2 section, can you make it so it opens a page in another frame? The way it is now you it wont open a page until you click on the 'samples block 1' or below.
A: Actually you cannot use links for the top items in the XP Style.
But theoretically you can use links for the top items. You can write
["<a href='index.html' class='home' target="frame">Home</a>","", "", "", "", "Return to Index page", "", "0", "", ],
["<a href='http://www.domain.uk' class='home' target="frame">About Us</a>","", "", "", "", "", "", "0", "", ],
["|Introduction","http://www.domain.uk/introduction.htm", "", "", "", "", "", "", "", ],
Q: Is it possible that a menuitem of the js dropdown menu stays highlighted after clicking and loading the new html site?
A: The menu has only two states normal and mouseover. We'll try to add the pressed state in the future.
You can set a pressed item using Javascript API:
function dm_ext_setPressedItem (menuInd, submenuInd, itemInd, recursion)
Sets a current pressed item.
menuInd - index of a menu on a page, >= 0.
submenuInd - index of a submenu, >= 0.
itemInd - index of an item, >=0.
recursion = true/false - highlight parent items.
But notice, to use dm_ext_setPressedItem() you should know ID of selected item and subitem.
You can't get this ID after you reload your page. That is why you should write your own code on PHP.
You can also set the correct
var pressedItem=1;
parameter on each html page.
Q: I am trying to figure out how to make multiple clickable Link popup windows on the same page. I want to have six or more. Here is what I have tried for having two windows and could not get to work:
<head>
<meta http-equiv="Content-Type" content="text/html; charset=utf-8" />
<title>Untitled Document</title>
<!-- DeluxePopupWindow.com -->
<noscript><a href="http://deluxepopupwindow.com">Javascript Popup Window by DeluxePopupWindow.com</a></noscript>
<script type="text/javascript" src="chase1.files/dpopupwindow.js"></script>
<script type="text/javascript" src="chase2.files/dpopupwindow.js"></script>
<!-- (c) 2008, http://deluxepopupwindow.com -->
============================================================================ ===============
<body>
<p><script type="text/javascript" src="chase1.js"></script>
<script type="text/javascript" src="chase2.js"></script> </p>
============================================================================ ================
<a href="javascript:;" id="chase1">Click Here to see a chase sample</a>
<a href="javascript:;" id="chase2">Click Here</a>
This does not work. I had it somewhat working. Is there a better way to do this? I will want to have at least 6 popup windows on the same page. I could not find any samples on your website.
A: You can do it in two ways:
1) Call different data files with DIFFERENT winID:"window1"!
2) Call only one data file and use deluxePopupWindow.open() function to open your windows:
<a href="javascript:;" onclick="deluxePopupWindow.open('window1', 'Content1 Content1', 'Window1',
'width=220,height=100,resizable,scrollbars=no,middle,right,fade-effect',
'windowsvista_graphite')">Click Here to see a chase1 sample</a>
See how to create popup windows:
http://deluxepopupwindow.com/window-installation-info.html
http://deluxepopupwindow.com/samples.htmlQ: Is it possible to change the mouseover font style to bold within the deluxe menu?
A: Unfortunately, JavaScript Tree Menu can't change font weight.
If you want to do that you can paste your own <div> withinitem's text field and change a font yourselves.
For example:
***
function changeFont(obj, over)
{
obj.style.fontWeight = over ? 'bold' : 'normal';
}
var menuItems = [
["<div onMouseOver='changeFont(this, 1)' onMouseOut='changeFont(this, 0)'>item text</div>", link, ...]
];
***

